How to Make Pixel Art in Google Sheets
Pixel art in Google Sheets works because every cell can be filled with a color. Make the cells square, fill them in the right pattern, and a picture appears. There are three ways to get there, from one minute to one lesson.
The fastest route is the free Google Sheets pixel art maker, which turns a picture into colored cells for you. This guide shows each step, plus how to do it entirely by hand.
Which method should you use?
- Method 1, copy and paste: you have a picture and want it in a sheet now.
- Method 2, import a file: you want a color key with it, are on a phone, or the paste does not keep the colors.
- Method 3, by hand: the point is the drawing itself, for example a lesson on cell formatting.
Method 1: convert a picture, then copy and paste
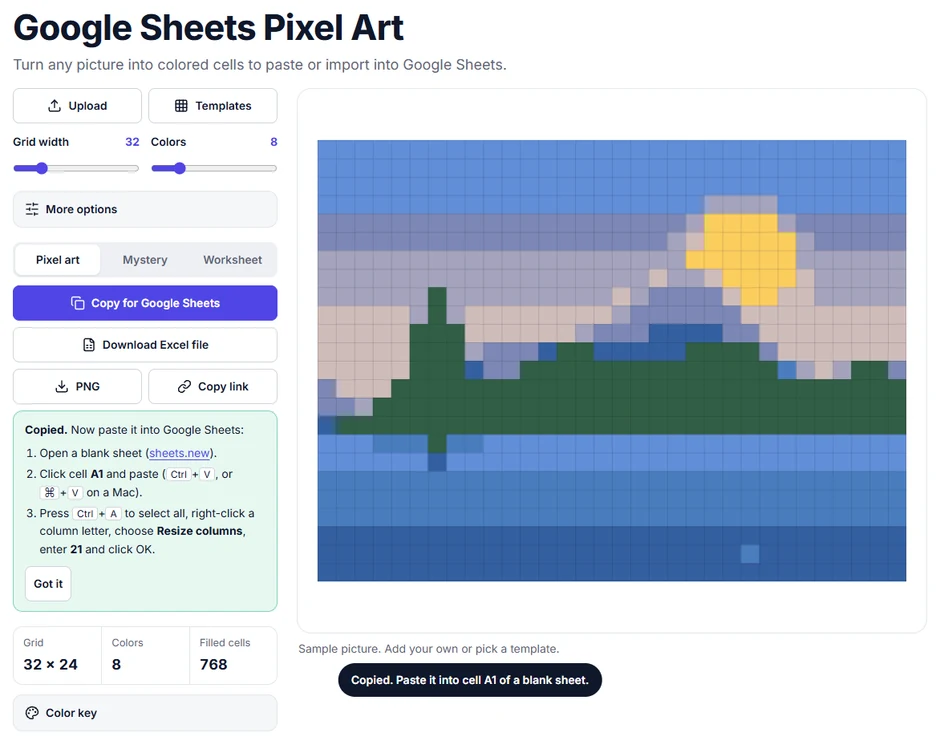
- Pick a picture. Open the maker and click Upload, or choose one of the starter templates. Simple pictures with one subject and few colors give the cleanest result.
- Choose the size. Grid width is the number of columns the picture will use. 32 is a good first size; the height follows the shape of your picture.
- Choose the colors. 6 to 10 colors keep the art bold. The preview updates as you move the sliders.
- Copy. Click Copy for Google Sheets. A short reminder of the next steps opens under the buttons.
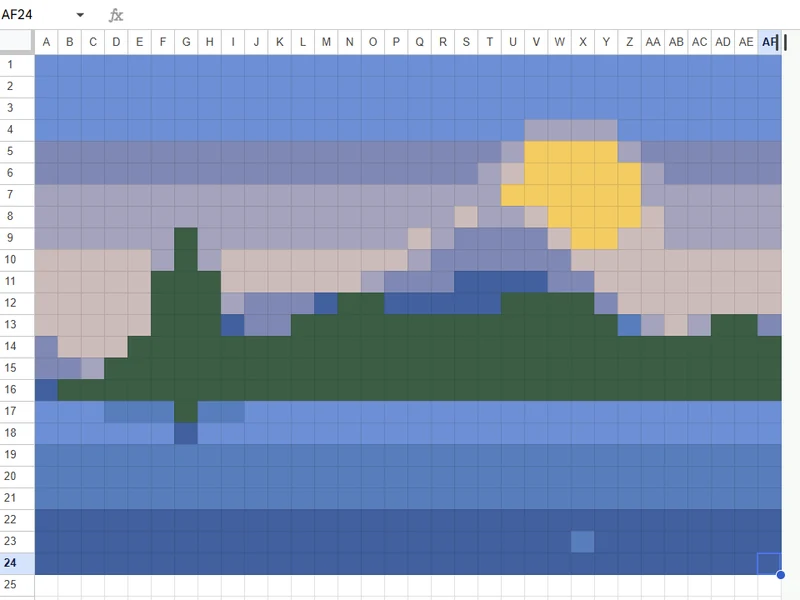
- Paste. Open a blank spreadsheet, click cell A1 once (do not double-click it), and press Ctrl+V, or ⌘+V on a Mac.
- Square the cells. The picture lands stretched sideways until you resize the columns; see Make the cells square below.
Method 2: import the Excel file
Importing takes a few more clicks but brings two sheets: the picture, and a Color Key listing every color with its number and cell count.
- In the maker, click Download Excel file.
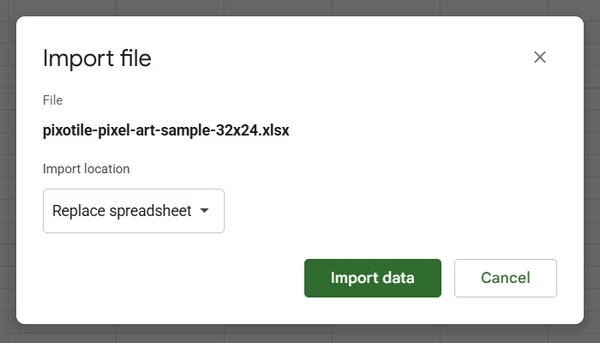
- Open a blank spreadsheet in Google Sheets and choose File, Import.
- Open the Upload tab and drag in the downloaded .xlsx file, or click Browse.
- Set Import location to Replace spreadsheet and click Import data.
On a phone or tablet, skip the menus: save the file, then open it from the Google Drive or Google Sheets app. This is also the only way to bring in a mystery picture, because its formulas cannot travel through the clipboard.
Method 3: draw it by hand
Drawing by hand is slower but teaches selecting ranges, formatting and planning with coordinates. Sketch the design on squared paper first, or work from a printed color-by-number sheet.
- Set up the grid. Open a blank spreadsheet and decide how wide the drawing will be, for example 26 columns (A to Z). Square those columns as in the next section.
- Leave nothing frozen. If rows or columns are frozen, a thick line cuts through the drawing. Choose View, Freeze, and set both No rows and No columns.
- Fill a color. Click a cell, or drag across a block of cells, then click the paint bucket (Fill color) in the toolbar and pick a color. Hold Ctrl (or ⌘) to add cells that are not next to each other.
- Repeat a color quickly. Select a finished cell, click the Paint format roller, then click or drag over the cells that should match.
- Zoom out to check. Use the zoom box in the toolbar (it shows 100%) and pick 50% or 75% to see the whole picture. Hide the cell lines under View, Show, Gridlines for a clean look.
To undo a wrong fill, press Ctrl+Z, or select the cell and choose Reset in the Fill color menu.
Make the cells square, and why 21 pixels
A new Google Sheet has rows 21 pixels tall and columns 100 pixels wide. Pixel art needs every cell to be as wide as it is tall, so the picture's columns must shrink to match the rows. Select the columns by their letters; selecting the whole sheet with Ctrl+A leaves Resize columns grayed out.
- Click the column letter A.
- Scroll right, hold Shift and click the last column letter of the picture. A picture 32 cells wide ends at AF, 48 at AV, 64 at BL; after you copy, the maker shows the right letter.
- Right-click any of the selected letters and choose Resize columns A - AF (the menu names your range).
- Type 21 and click OK.
To skip resizing altogether, use Method 2: a picture imported from the Excel file with File, Import, Upload arrives with square cells.
Keep the row height at its default of 21. Changing both is possible, but 21 by 21 is the size the sheet already uses for rows, so only one setting has to change and the picture stays the same size on every computer. If someone has resized rows, click row number 1, hold Shift and click the last row of the picture, then right-click a selected number, choose Resize rows and enter 21 again.
Turn it into a math activity
A picture in Google Sheets becomes a self-checking quiz when each correct answer reveals one color. The maker's Mystery mode builds that file for you, with math facts at three levels or your own questions for any subject. The mystery pixel art guide for teachers covers question ideas by grade, sharing through Google Classroom, and what to do when a picture stays blank.
Troubleshooting
The colors are missing after pasting
The sheet received plain text instead of the colored table. Check three things: you pasted with Ctrl+V rather than Ctrl+Shift+V (which pastes values only); cell A1 was selected, not open for typing; and you are using Chrome, Edge or another desktop browser. If it still fails, import the file with Method 2.
Only columns A to Z show up
A new sheet starts with 26 columns. A paste adds the extra columns it needs, and so does importing a Pixotile file, because every filled cell holds a small color number. Files from elsewhere that have colors but empty cells can be cut back to column Z on import. If that happens, insert more columns (right-click column Z, Insert 1 column right, and repeat) or use the paste method.
The cells are rectangles, not squares
The columns are still 100 pixels wide, or the rows were changed. Repeat the resize steps above for columns, and for rows if needed. Zooming does not change the shape, so check at 100%.
Phones and Chromebooks
The Google Sheets phone and tablet apps often drop colors when pasting, so use the downloaded file there. Chromebooks behave like any computer: the paste method works in Chrome with nothing to install. If a school-managed Chromebook blocks the clipboard, the import method gives the same result.
Quick answers
How long does it take to make pixel art in Google Sheets?
With a picture converter and copy and paste, about a minute. Coloring a 32 by 32 drawing by hand takes most students 30 to 60 minutes, depending on how many colors they use.
Can I color the cells from numbers with conditional formatting?
Yes. Select the grid, open Format, then Conditional formatting, choose "Is equal to", type 1 and pick a fill color. Add one rule per number. This is how a numbers-only paste can be turned back into a picture, and it is a good lesson in formatting rules.
How do I print Google Sheets pixel art?
Choose File, then Print. Set Scale to Fit to page, choose landscape for a wide picture, and under Formatting tick or untick Show gridlines depending on whether you want lines between the cells.
How big a picture can a Google Sheet hold?
A spreadsheet can hold up to 10 million cells, so size is never the limit for pixel art. Pictures wider than about 64 cells simply become slow to color by hand and hard to see without zooming out.
Can I share my pixel art without letting people change it?
Yes. Click Share, add people or copy the link, and set the access to Viewer. Viewers can see and zoom the picture but cannot change any cell.
Related tools
- Google Sheets pixel art maker: picture to colored cells, ready to paste or import.
- Spreadsheet pixel art maker: all three modes, including mystery pictures and printable worksheets.
- Excel pixel art generator: the same pictures as an .xlsx for Excel desktop and Excel for the web.
- Mystery pixel art for teachers: turn a picture into a self-checking activity.
Last updated: November 12, 2026